


Introduction
Django is a popular web framework written in Python that allows developers to easily create scalable, maintainable web applications. One of the many benefits of using Django is its flexibility when it comes to integrating with different channels and protocols. In this post, we'll build a real-time chat application with Django Channels, focusing on how to integrate Django with Django Channels.
What are Django channels?
Getting Started
To get started, you'll need to install Django and Redis. If you don't already have these installed, follow the instructions for your operating system here:
- Django
- Redis
Once you've installed both of those, create a virtual environment with Python 3 (the latest version). You can do this by running
in your terminal or command prompt where "myvenv" is the name of your virtual environment. Then activate it by typing source ./myenv/bin/activate at the top level of your project directory (i.e., not inside any folder). Start by creating a new directory and setting up a new Django project.
Installing Channels
You can do this using Pip, the Python package manager
Add channels to your Django project
Next, you'll need to add channels to your Django project. Open your project's settings.py file and add the following to the INSTALLED_APPS list:
Configuring Redis
The first step is to install Redis, which can be done on Linux and MacOS by using your package manager. If you're running Windows, check out the official installation instructions for details on how to get started with Redis or you can install it using WSL (Windows subsystem for linux).
We have to modify the settings.py file to let Django know that our redis server is live.
Code

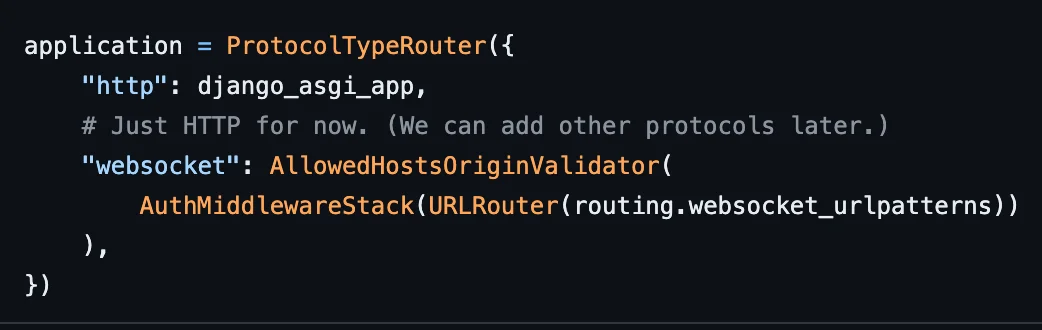
Since we'll be using WebSockets instead of HTTP to communicate from the client to the server, we need to wrap our ASGI config with ProtocolTypeRouter in core/asgi.py:
Code
Next, we need to let Django know the location of our ASGI application. Add the following to your settings.py file, just below the WSGI_APPLICATION setting:
WSGI_APPLICATION = chat.wsgi.application' # replace this
ASGI_APPLICATION = chat.asgi.application' # with this
Integrating Django Channels
In this section, we'll create a consumer. Then, we'll set up routing so that messages can be sent and received from the server. A consumer is the basic unit of Channels code. They are tiny ASGI applications, driven by events. They are akin to Django views. However, unlike Django views, consumers are long-running by default.
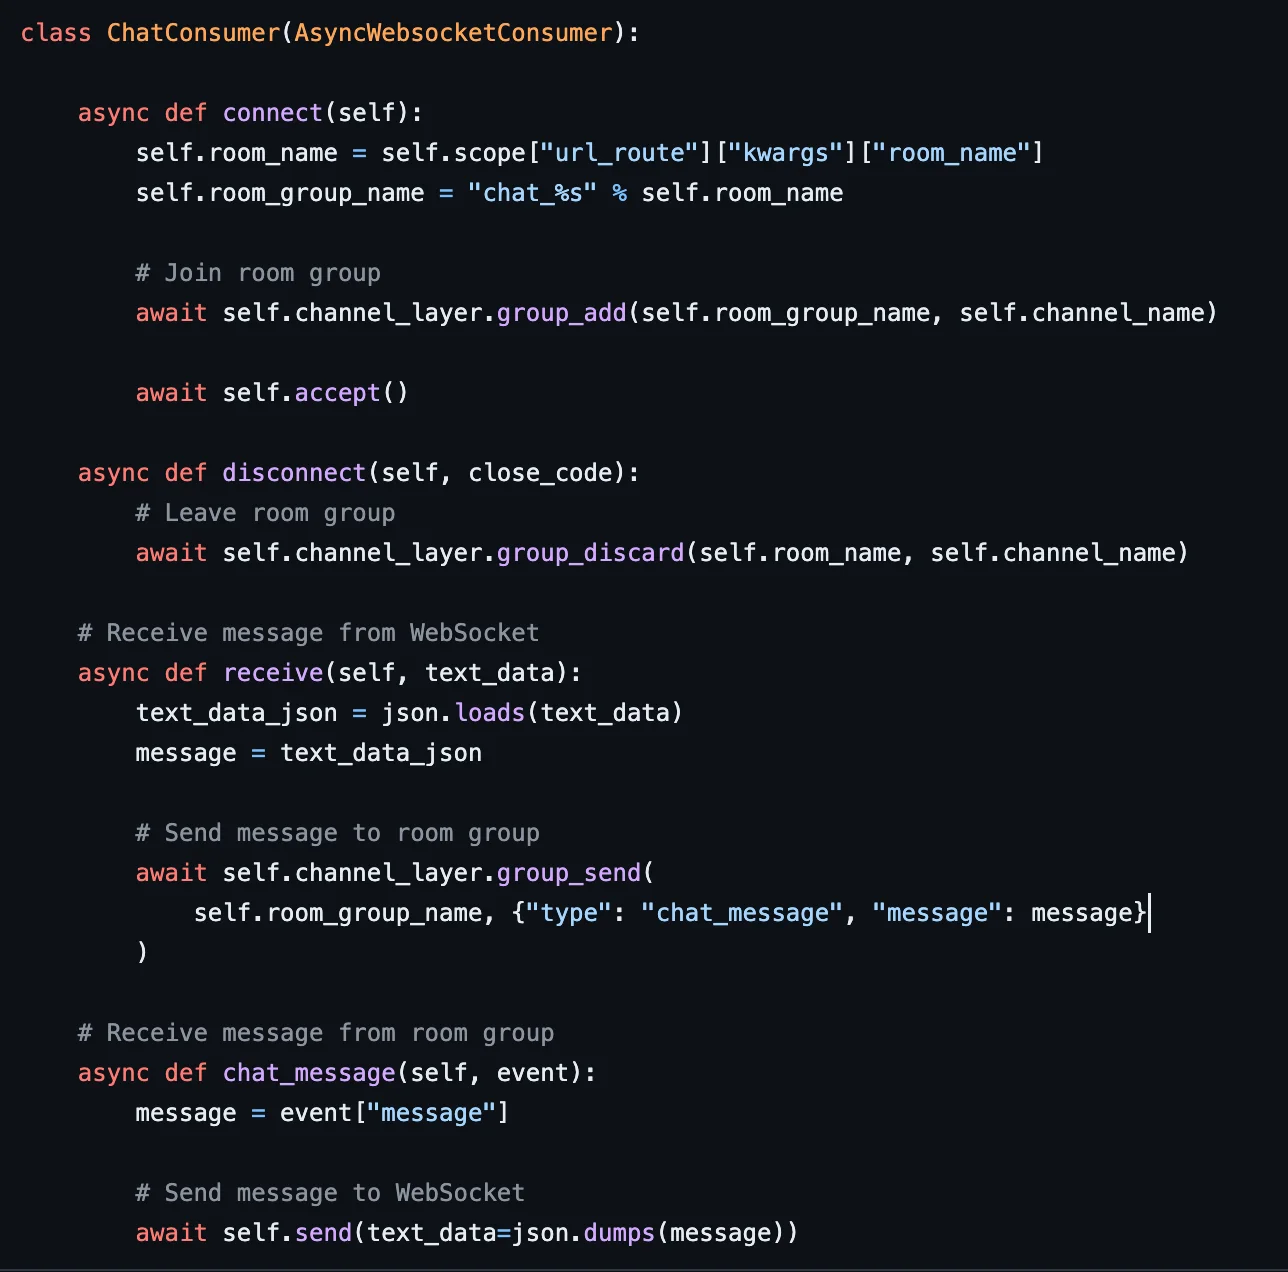
Next, let's create our Consumer class:
Code:
class ChatConsumer(AsyncWebsocketConsumer):
async def connect(self):
self.room_name = self.scope["url_route"]["kwargs"]["room_name"]
self.room_group_name = "chat_%s" % self.room_name
# Join room group
await self.channel_layer.group_add(self.room_group_name, self.channel_name)
await self.accept()
async def disconnect(self, close_code):
# Leave room group
await self.channel_layer.group_discard(self.room_name, self.channel_name)
# Receive message from WebSocket
async def receive(self, text_data):
text_data_json = json.loads(text_data)
message = text_data_json
# Send message to room group
await self.channel_layer.group_send( self.room_group_name, {"type": "chat_message", "message": message}
)
# Receive message from room group
async def chat_message(self, event):
message = event["message"]
# Send message to WebSocket
await self.send(text_data=json.dumps(message))
Here we’ve implemented 3 methods
- connect: This method is called when a new WebSocket connection is established. You can perform any necessary setup in this method.
- disconnect: This method is called when the WebSocket connection is closed. You can perform any necessary cleanup in this method.
- receive: This method is called when a message is received from the WebSocket connection. You can process the message and send a response back to the client in this method.
Add Channels Routing
Channels provide different routing classes which allow us to combine and stack consumers. They are similar to Django's URLs.
Add a routing.py file to "chat":
In this example, we've defined a WebSocket route that matches URLs starting with ws/chat/ followed by a room name. We've also defined a ChatConsumer class, which we'll define next.
Conclusion
In this post, we covered how to set up Django Channels with Redis. We started by creating a simple app and then adding channels to it. With the help of Django development services, you learned how to use the channel API and write your own channel classes and routing. With this knowledge, you can start building real-time web applications with Django and channels.